|
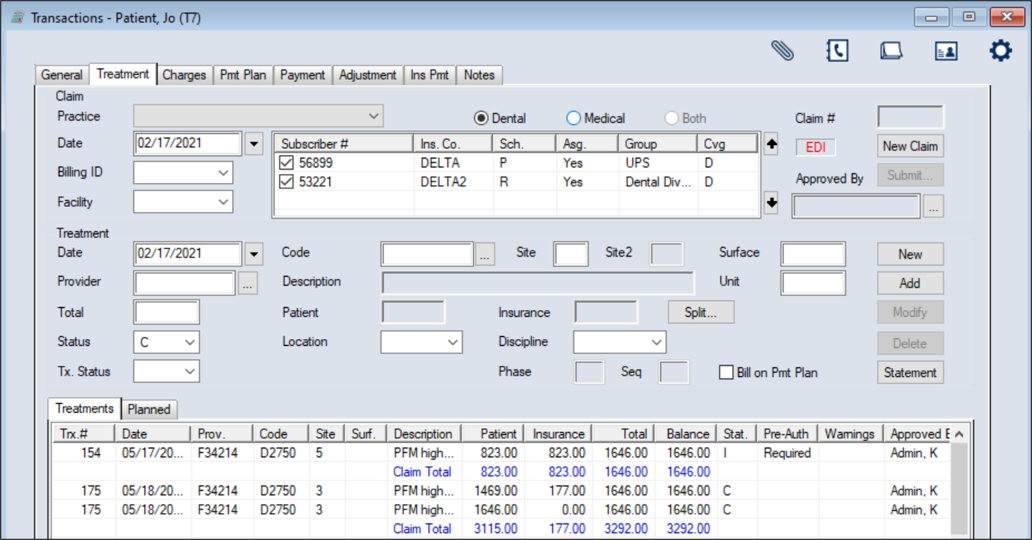
The Treatment tab displays approved procedures on the patient’s record that were added from the EHR module or directly from this tab. It allows you to review, add, modify, and submit treatments and claims as necessary.
Important: Treatments do not display in the Transactions module until they have been approved. Treatments added from the Transaction module do not require approval but will still display in the EHR module.
 Enter Treatments Enter Treatments
- Select a patient and open the Transactions module and click the Treatment tab > Treatments or Planned sub-tab.
- Click New Claim.
Tip: To add the treatment to an existing claim, click New. This clears the Treatment area fields and defaults the Date field to the current date.
- Complete the fields in the Claim area.
Note: If adding the treatment to an existing claim, skip to Step 4.
Claim Fields
| Practice |
Select the practice where the procedures on this claim were performed from the drop-down.
|
| Date
|
This defaults to the current date.
If necessary, select another date from the calendar drop-down.
|
| Billing ID
|
Select the billing doctor or fee schedule to be used for this claim entry.
|
|
Facility |
Select the facility at which the treatments on this claim were performed.
|
| Dental / Medical / Both |
Select the correct radio button to indicate if this is a dental or medical treatment, or both.
|
| Claim # |
This read-only field displays an axiUm-generated claim number that is assigned when you click Add in the Treatment section.
|
| Approved By |
This indicates the faculty member that approved this treatment to be added.
If necessary, click the ellipsis to select from the Users List window.
|
- Complete the fields in the Treatment area as necessary and click Add.
Treatment Fields
| Date |
This defaults to the current date.
If necessary, select another date from the calendar drop-down.
|
|
Provider
|
Enter the provider ID of the provider who performed the treatment or click the ellipsis to select from the Providers List window.
|
|
Code
|
Enter the procedure code for the treatment or click the ellipsis to select from the Procedure Codes List window.
|
|
Site / Site2
|
If applicable, enter the site number that required treatment.
If applicable, enter the second site number that required treatment.
Note: Site2 is only enabled if the procedure code entered in the Code field requires a second tooth site.
|
| Surface |
If applicable, enter the tooth surface(s).
|
|
Description
|
This read-only field displays the description of the selected procedure code. |
|
Unit
|
If applicable, enter the number of units of this procedure.
|
|
Total
|
This field displays the default total cost of the selected procedure.
If necessary, you can modify this manually before the treatment is added.
|
|
Status
|
Select the appropriate status for the treatment.
Note: If adding the treatment from the Planned sub-tab, < Planned Treatment > displays instead of this field.
|
|
Tx. Status
|
(Optional) Select a custom status for this procedure from the drop-down.
Note: This field is most frequently used if a treatment is a specialty case.
Example: It can indicate that a treatment was redone.
|
|
Patient / Insurance
|
These read-only fields display the portions of the total charge that are expected from the patient and insurance on behalf of the patient.
|
|
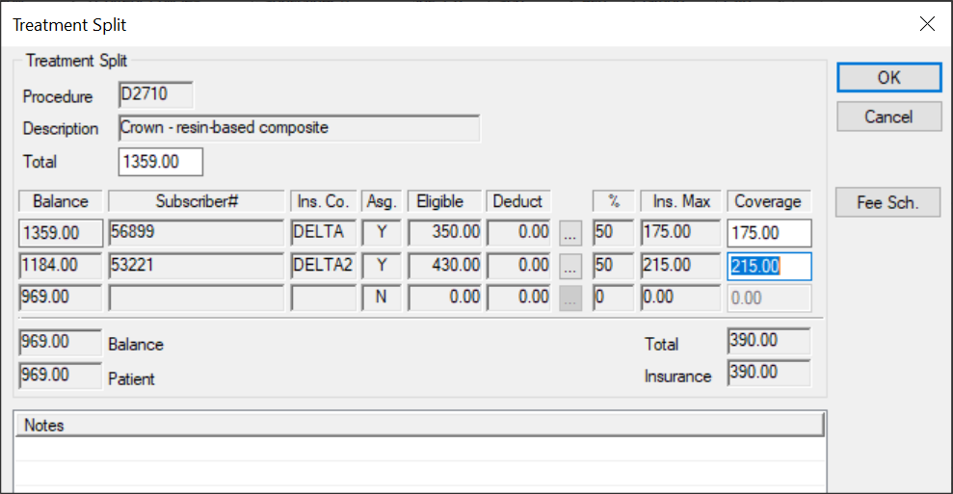
Split
|
If necessary, you can review the totals and fees that will be submitted to insurance.
Click the button to display the Treatment Split window and review the fields as necessary.
Tip: If the patient does not have insurance, you can adjust the total patient payment amount.
|
|
Location
|
Select the location where this treatment was performed from the drop-down.
|
|
Discipline
|
Select the discipline under which this treatment was performed from the drop-down.
|
|
Medical…
|
Note: This button is only enabled if a medical procedure is added.
Click the button to display the Tx Medical Information window.
|
| Phase / Seq |
These read-only fields display the phase and the sequence assigned to this treatment.
Note: This only displays for treatments that were added from the EHR.
|
| Bill on Pmt Plan |
Select the checkbox if this treatment will be applied to the current payment plan.
|
-
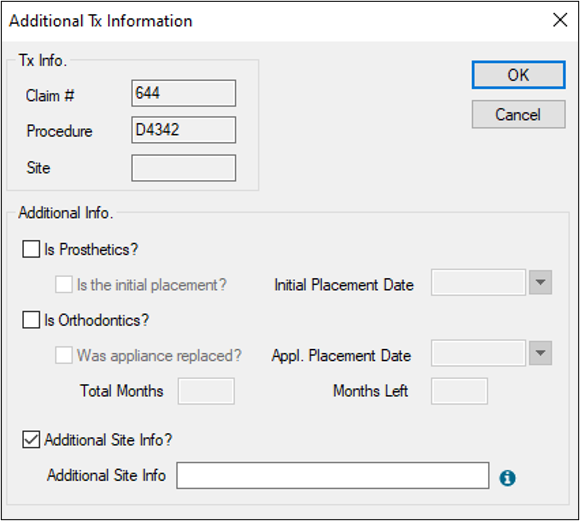
If prompted with the Tx Service Information window, complete the fields as necessary and click OK.
-
If prompted with the Additional Tx Information window, complete the fields as necessary and click OK.
-
(Optional) To add additional treatments to the existing claim, click New and repeat Steps 4-6.
Note: Depending on how your institution is configured, claims may be queued automatically and turn black, or you may need to queue and submit manually.
Enter Additional Treatment Information
If a treatment is for prosthetics or orthodontics, additional information must be entered when the treatment is moved to in process or complete status.
Note: Although this is typically done when entering treatment, it can also be done later from a right-click option.
Additional information may also be needed if a patient has insurance configured to require additional site information for a procedure. In these cases, the Additional Tx Information window displays when you enter or change the status of an applicable procedure code.
To add additional treatment information:
- Open the Additional Tx Information window using your usual workflow.
Examples: Enter treatment or click the Treatment tab > Treatments sub-tab, select a listed record, right-click and select Additional Tx.
-
Complete the Additional Info. fields as necessary and click OK.
| Is Prosthetics? |
Select the checkbox if the treatment is a crown-type or a bridge-type treatment.
Note: If selected, the Is the initial placement? and Initial Placement Date fields are enabled.
|
| Is the initial placement?
|
If enabled, select the checkbox to indicate this the first crown fitting or bridge fitting for this patient.
Note: If selected, the Initial Placement Date field is disabled.
|
| Initial Placement Date
|
If enabled, select the date of the first crown fitting / bridge fitting from the calendar drop-down.
|
|
Is Orthodontics? |
Select the checkbox if the treatment is an ortho-type or a bridge-type treatment.
Note: If selected, the Was the appliance placed?, Appl. Placement Date, Total Months, and Months Left fields are enabled.
|
| Was appliance replaced? |
If enabled, select the checkbox to indicate this treatment is an ortho appliance replacement for the patient.
|
| Appl. Placement Date |
If enabled, select the date the ortho appliance was replaced from the calendar drop-down.
|
| Total Months |
If enabled, enter the total number of months for this ortho treatment. |
| Months Left |
If enabled, enter the total number of months remaining on this ortho treatment.
|
| Additional Site Info? |
Select the checkbox to indicate that an insurance company requires additional site information for the procedure code. |
| Additional Site Info |
Note: This field is only enabled if the Additional Site Info? checkbox is selected.
Enter the individual teeth and/or tooth ranges required for this procedure.
Tip: This field accepts alpha-numeric characters. Individual tooth numbers must be separated by a comma while tooth ranges must be indicated by a hyphen.
Examples: 25-32, P-T, 75, 82, PS, TS
|
Manage Treatments
- Select a patient and open the Transactions module.
- Click the Treatment tab > Treatments or Planned sub-tab and review the listed planned or in process and completed treatments.
-
To perform a task, complete any of the following:
Edit Treatments
Treatments that have not yet been queued and/or submitted to insurance on a claim can be easily modified.
Note: Queued treatments that are ready for insurance submission must be unqueued before you can edit them. Submitted treatments must be rebilled after you make changes.
-
Select a listed record.
-
If necessary, right-click the treatment and select Remove from Submission Queue.
-
Make the necessary changes and click Modify.
Delete Treatments
If a treatment was entered in error and requires deletion, any payments or adjustments applied to it will be unallocated prior to deletion.
Important: Queued treatments that are ready for insurance submission must be unqueued before you can delete them.
-
Select a listed record.
-
If necessary, right-click the treatment and select Remove from Submission Queue.
-
Click Delete.
-
When prompted, click Yes to confirm your deletion.
Suspend/Unsuspend Treatments
When necessary, you can suspend in process treatments to prevent users from completing the treatment.
Example: A patient is not expected to return to complete an in process treatment.
If the treatment was suspended in error or the patient returns to the institution, you can also unsuspend in process treatments.
-
Select a listed record and complete any of the following:
-
Right-click and select Suspend In Process Tx.
The treatment is suspended. An S displays in the Stat. column and on the upper pane next to the Status field.
-
Right-click and select Unsuspend In Process Tx.
The treatment is unsuspended, and the S is removed from the Stat. column and the upper pane next to the Status field.
View Treatment History
-
Select a listed record.
- Right-click and select Show History to display the applicable window.
Note: One of the Ins. Payment History window, Adjustment History window, or Payment History window displays, depending on whether you select an insurance, adjustment, or payment record.
-
Select a listed record and review the fields as necessary.
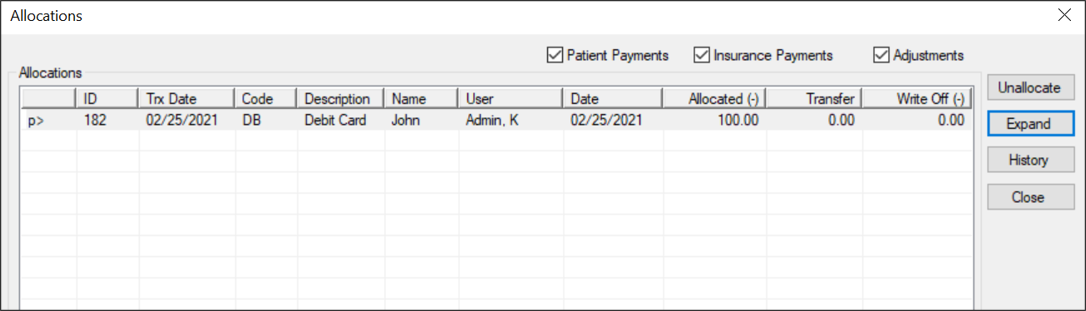
Display Allocations
Allocations are the list of payments and adjustments that have been applied to a selected record.
-
Select a listed treatment.
- Right-click and select Show Allocations to display the Allocations window.
-
(Optional) To filter the listed records, select any of the following checkboxes:
-
Patient Payments
-
Insurance Payments
-
Adjustments
-
Review the listed records.
-
(Optional) Complete any of the following:
-
To separate the payment and adjustment amounts by line, select a record and click Expand.
-
To view the history of an allocation, select a record and click History.
-
To unallocate a record, select a record and click Unallocate.
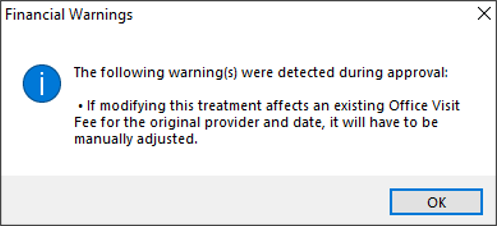
View Financial Warnings
When necessary, you can review financial warnings that are associated with a specific treatment. This allows you to address financial issues as necessary.
Note: Financial warnings associated with the treatment may also have displayed when it was approved.
Tip: Treatments that have a warning associated with them display Yes in the Warnings column.
-
Select a listed record.
- Right-click and select Show Financial Warnings… to display the Financial Warnings window.
-
Review the warnings as necessary and click OK.
Print Fee Estimates
-
Select a listed record.
- Right-click and select Print Estimate to display the Select Planned Treatments window.
-
Select the treatment you want to show on the estimate.
Tip: You can press Ctrl to multi-select treatments or click Select All / Deselect All as necessary.
- When ready, click OK to display the Estimate window.
- Complete the fields as necessary and click Print.
A preview displays for the signers to review.
-
Close the preview, and when prompted with the Patient Signature window, have the patient sign.
-
Click OK and when prompted, click Yes to print the estimate.
View Estimate History
-
Select a listed record.
- Right-click and select Estimate History to display the Estimate History window.
-
Review the records as necessary.
- (Optional) Select a listed record and click View… to view the estimate.
View Tx Consent History
-
Select a listed record, right-click and select Tx Consent History to display the Tx Consent History window.
Tip: To include deleted records, select the Show Deleted checkbox.
-
Select a listed record and review the fields as necessary.
Manage Disputed Treatments
When necessary, you can indicate that certain treatments are under dispute.
Example: A patient is not satisfied with the treatments they received and refuses payment.
Note: You can only dispute in process and completed treatments. Planned treatments have not occurred yet and cannot be disputed.
Tip: You should record the reason a treatment was disputed using a patient note.
A disputed treatment cannot be billed until the dispute is settled. Any associated treatment costs are excluded from the patient’s expected total but are still included in the accounts receivable. Once settled, you can take the treatment off hold and submit it on a claim or write off, if applicable.
-
Select a listed record and complete any of the following:
Note: Disputed records display in red text.
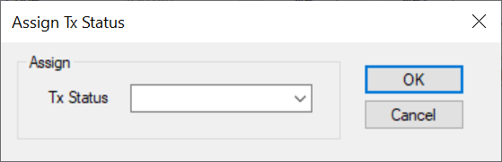
Assign Tx Status
When necessary, you can assign a specific status to a planned, in process, or completed treatment.
Example statuses: Reactivated and Redo Procedure.
Note: The available statuses are configured by your institution during module setup.
-
Select a listed record.
- Right-click and select Assign Tx Status to display the Assign Tx Status window.
-
From the Tx Status drop-down, select a status and click OK.
Update Planned Treatments
As a treatment passes thorough the typical lifecycle at your institution, you may need to move a treatment from planned status to in process and/or completed status.
- Select a patient and open the Transactions module.
- Click the Treatment tab > Planned sub-tab and review the listed planned treatments.
Tip: You can press Ctrl to select and update multiple treatments at once.
- Complete any of the following:
Change Treatments to In Process
This allows you to mark the treatment as in process.
-
Select a listed treatment, right-click, and select Change to In Process.
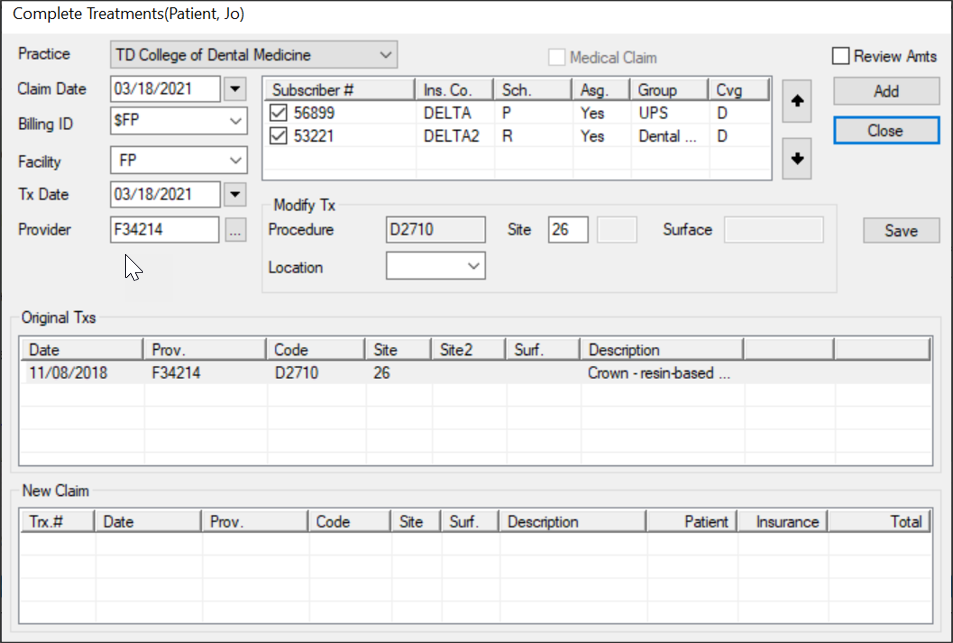
Complete Treatments on New Claims
This allows you to mark the treatment as complete and create a new claim.
-
Select a listed treatment, right-click, and select Complete as New Claim.
Complete Treatments on Last Claim
This allows you to mark the treatment as complete and appends it to the last claim.
-
Select a listed treatment, right-click, and select Complete on Last Claim.
The Complete Treatments window displays and the planned treatment(s) display in the Original Txs area.
Note: If you selected Complete on Last Claim, the Claim Date, Billing ID, and Facility fields are disabled.
-
Complete the following for each treatment listed:
-
Review and modify the fields as necessary.
-
Click Add to move the treatment(s) to the New Claim area and display the amount charged.
-
Click Close to exit the Complete Treatments window.
The treatment(s) are removed from the Planned sub-tab and now display on the Treatments sub-tab.
If you selected Complete on Last Claim or Complete as New Claim, the status now displays as C. If you selected Change to In Process, the status now displays as I.
Update In Process Treatments
As a treatment passes thorough the typical lifecycle at your institution, you may need to update an in process treatment. This may include adding a visit or moving a treatment from in process status to completed status and placing it on a new or previous claim.
To update in process treatments:
- Select a patient and open the Transactions module.
- Click the Treatment tab > Treatments sub-tab and review the listed in process treatments.
Tip: You can press Ctrl to select and update multiple treatments at once.
- Complete any of the following:
Complete Treatments on New Claims
This allows you to mark the treatment as complete and create a new claim.
-
Select a listed treatment, right-click, and select Complete Tx.
Complete Treatments on Last Claim
This allows you to mark the treatment as complete and appends it to the last claim.
-
Select a listed treatment, right-click, and select Complete Tx (Last Claim).
Add In Process Tx Visits
This allows you to add a visit for a specific treatment. It indicates that the patient came in for work on an in process treatment but the procedures is still incomplete.
-
Select a listed treatment, right-click, and select In Process Tx Visit.
The Complete Treatments window displays and the in process treatment(s) display in the Original Txs area.
Note: If you selected Complete Tx (Last Claim), the Claim Date, Billing ID, and Facility fields are disabled.
-
Complete the following for each treatment listed:
-
Review and modify the fields as necessary.
-
Click Add to move the treatment(s) to the New Claim area and display the amount charged.
-
Click Close.
- If prompted with the Additional Tx Information window, complete the fields as necessary.
If you selected Complete Tx or Complete Tx (Last Claim), the status now displays as C. If you selected In Process Tx Visit, the status still displays as I.
Manage Claims
Claims outline the procedures performed on patients and the amounts charged. In order to collect insurance amounts for procedures, you must queue and submit all claims to the correct insurance companies.
Note: You can queue a claim to group with other claims and indicate that it is ready to be submitted to insurance. This makes claim management easier.
Tip: axiUm may be configured to auto-queue all treatments/claims to the Print Held window or the EDI Claims window once a treatment has been approved. This is set from the Maintenance > Office > Practices > Practice Options > Auto queue claim upon Patient Approvals checkbox.
There are two reasons to queue and submit a treatment to insurance:
-
Receive pre-authorization: Some insurance companies require you to submit a pre-authorization for work before the treatment can be started. In this situation, the insurance company wants to review and approve the treatments before agreeing to provide coverage for them. Once received, you can begin treatment.
Note: Treatments that require pre-authorization are determined during setup.
Important: In some cases, coverage may be partially or fully denied. The patient must be informed of the decision before treatment can begin.
-
Receive payment for work: This occurs after work has been done on a patient and the treatment’s status has changed to in process and/or completed, or an in progress visit has been added.
Important: In some cases, coverage is partially or fully denied, and the payment received reflects this decision.
Note: The timing of when treatment should be submitted depends on your institution’s workflow and the insurance company receiving the claim.
Example: A treatment has multiple step codes and requires several visits. A claim is submitted to the insurance company after each visit occurs until the treatment is complete.
Claims can be submitted to an insurance company in one of two ways:
-
Electronic Claims: Electronic claims can be queued and made ready for EDI submission from the Transactions module. They are then submitted electronically via the EDI Claims module.
Important: All electronic claims must later be submitted via the EDI Claims module or Maintenance > System > Processes > EDI Claims window.
-
Paper Claims: Paper claims are claims that have been dropped to paper. This means they are printed and mailed to the insurance company. Depending on the workflow used by your institution, they can be printed immediately or held to be printed at a later date.
Important: If holding to print at a later date, paper claims must be printed via the Maintenance > System > Processes > Print Held Claims window.
Submit Planned Treatments for Pre-Authorization
Some insurance companies need to review certain treatments before providing coverage for them.
Important: You can only submit planned treatments for pre-authorization.
-
Select a patient and open the Transactions module.
-
Click the Treatment tab > Planned sub-tab and review the listed treatments.
-
Select a listed treatment and click Submit… to display the applicable insurance claim window.
-
Complete the fields as necessary and click OK.
Enter Received Pre-Authorizations
After submitting a planned treatment for review, you can enter the pre-authorization response you received from the insurance company.
-
Select a patient and open the Transactions module.
-
Click the Treatment tab > Planned sub-tab and review the listed treatments.
-
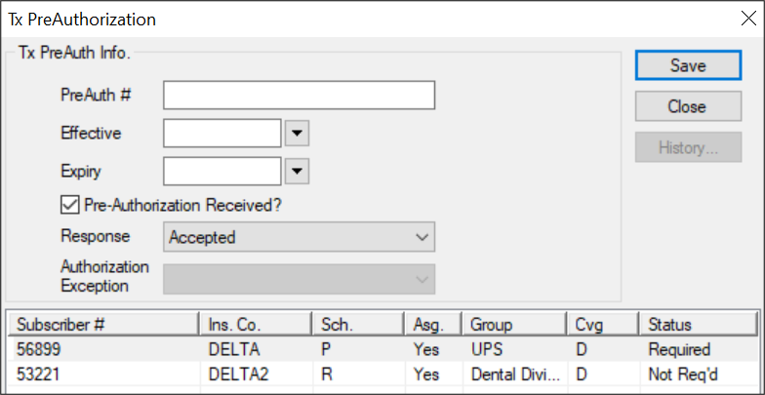
Select a listed treatment, right-click and select PreAuthorization# to display the Tx PreAuthorization window.
-
Complete the fields as necessary and click Save.
| Pre-Authorization Received? |
Select the checkbox to indicate a pre-authorization response has been received.
|
| PreAuth # |
Enter the pre-authorization number received from this insurance company.
Note: The field holds a maximum of 20 and 14 characters for dental practices in the US and Canada, respectively.
|
| Effective |
Select the effective date from the calendar drop-down.
|
| Expiry |
Select the expiry date from the calendar drop-down.
|
| Response |
Select Accepted or Denied from the drop-down.
|
| Authorization Exception |
Note: This field is only enabled if the Response field is set to Denied.
If necessary, you can override the denial with an authorization exception.
Select an entry from the drop-down:
-
Immediate/Urgent Care
- Retroactive Services
- Emergency Care
- Temporary Client
- Request for 2nd Opinion
- Override Pending
- Special Handling
|
Queue Treatments/Claims
You can queue a claim to group with other claims and indicate that it is ready to be submitted to insurance. Because a claim can only hold treatments for a single patient, submitting/printing claims individually would be cumbersome and time consuming; marking claims as queued allows them to be submitted/printed in larger groups which are easier to manage.
Treatments display in green text if they are not yet queued and have not been submitted to insurance.
-
Select a patient and open the Transactions module.
-
Click the Treatment tab > Treatments or Planned sub-tab and review the listed treatments.
-
Select a listed record that is ready for submission and click Submit… to queue for submission.
-
If prompted with an insurance claim window, complete/modify the fields as necessary and click OK.
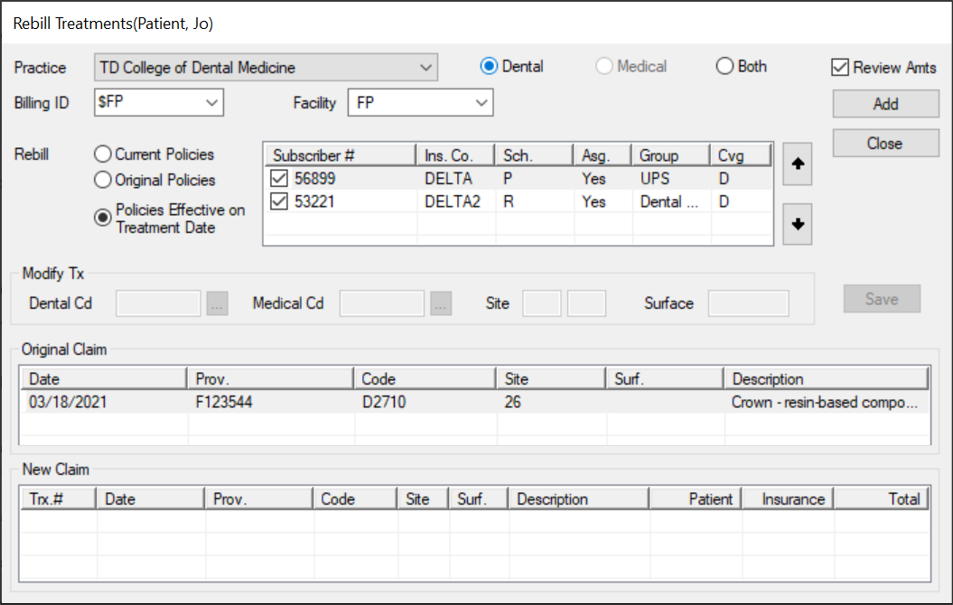
Rebill Treatments/Claims
If treatments have already been submitted to insurance and you must make changes to the treatment details, you must rebill the treatment/claim.
Example: If insurance information that affects the claim was entered incorrectly into axiUm, you must make the necessary changes in axiUm, then rebill the claim/treatment to apply those insurance changes.
Important: Because any changes made to insurance, procedures, or fee guides do not automatically affect submitted claims, you must rebill any claims impacted by the changes.
Depending which information was changed, you can choose to rebill the entire claim or just a treatment within that claim. If rebilling an entire claim, axiUm rebills all treatments on the same claim number. If rebilling a treatment, axiUm rebills only the selected treatment within that claim.
To rebill treatments/claims:
-
Select a patient and open the Transactions module.
-
Click the Treatment tab > Treatments sub-tab and review the listed treatments.
-
If necessary, make all edits that will be reflected on the treatment/claim or the patient record.
Note: Depending on the changes that are necessary, this may require leaving the Transactions module or accessing another module from within the Transactions module.
-
Complete any of the following:
-
To rebill one treatment on the claim, right-click the treatment and select Rebill Treatment.
-
To rebill all treatments on the claim, right-click any treatment in the claim and select Rebill Claim.
The Rebill Treatments window displays and the treatment(s) display in the Original Claim area.
-
Complete the following for each treatment listed:
-
Review and modify the fields as necessary.
| Practice |
Select the practice where the procedures on this claim were performed from the drop-down.
|
| Billing ID |
Select the billing doctor or fee schedule to be used for the rebilled claim entry.
|
| Dental / Medical / Both |
Select the correct radio button to indicate if this is a dental or medical treatment, or both.
Note: If Medical or Both is selected, the fields in the Modify Tx section are enabled.
|
|
Review Amts |
If necessary, you can review the totals and fees that will be submitted to insurance.
Select the checkbox to display the Treatment Split window when you click the Add button.
|
| Facility |
Select the facility at which the treatments on this claim were performed.
Note: This is required for medical claims, but optional for dental claims.
|
| Rebill |
Select a radio button to determine the appropriate patient insurance information:
- Current Policies: This rebills the treatment using the policy information currently displayed in the Patients module > Patient Card window.
- Original Policies: This rebills the treatment using the policy information used when the treatment was first submitted.
- Policies Effective on Treatment Date: This rebills the treatment using the policy information in the Patients module > Patient Card window that was effective on the date of treatment.
|
| Dental Cd |
This displays the dental procedure code associated to this claim.
If enabled and required, you can click the ellipsis to select from the Procedure Codes List window.
Note: The Category drop-down only displays ADA entries.
|
| Medical Cd |
This displays the medical procedure code associated to this claim.
If enabled and required, you can click the ellipsis to select from the Procedure Codes List window.
Note: The Category drop-down only displays CPT entries.
|
| Site |
If enabled, enter the tooth site associated to this procedure. |
| Surface |
If enabled, enter the tooth surface associated to this procedure. |
-
Click Add to move the treatment(s) to the New Claim area and display the amount charged.
-
If the Treatment Split window displays, review and modify the Total and Coverage fields as necessary, then click OK.
-
Click Close.
The original record is now struck out and a new record displays in the list.
Perform Other Tasks
You can perform a variety of other tasks related to claims.
- Select a patient and open the Transactions module.
- Click the Treatment tab > Treatments or Planned sub-tab and review the listed treatments.
-
To perform a task, complete any of the following:
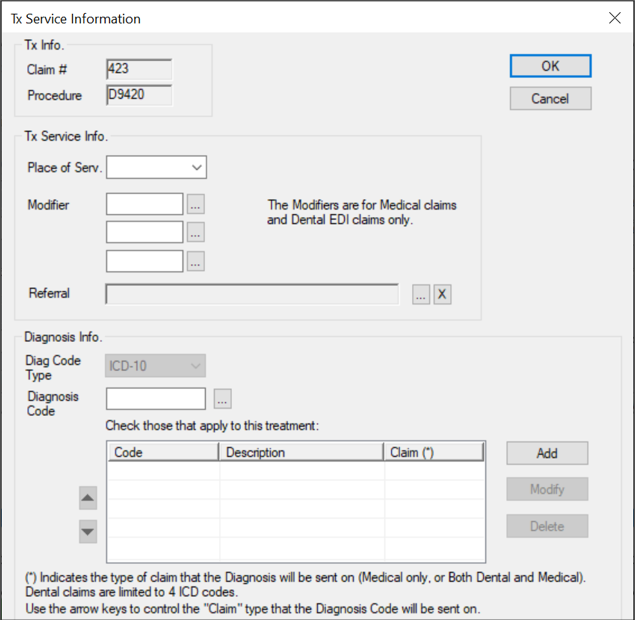
Enter Treatment Service Information
If a treatment is for a medical claim, you can add detailed information before the claim is submitted.
-
Select a listed record, right-click and select Tx Service Information… to display the Tx Service Information window.
-
Complete the fields as necessary and click OK.
Remove Claims from Queue
-
Select a listed record, right-click and select Remove from Submission Queue.
-
When prompted to confirm, click Yes.
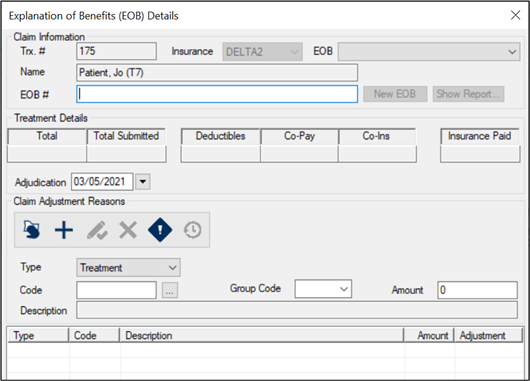
View the EOB
-
Select a listed record, right-click, and select EOB Details… to display the Explanation of Benefits (EOB) Details window.
- Review the Claim Information, Treatment Details, and Claim Adjustment Reasons sections as necessary.
View Claim Submission History
-
Select a listed record, right-click and select Claim Submission History… to display the Claim Submission History window.
-
Select a listed record and review the fields as necessary.
-
(Optional) To print, click Print Copy or Reprint as necessary.
View Remittance Details
Many treatments are paid for in part or completely by insurance. When necessary, you can review the details for a claim that has been paid or rejected by insurance.
-
Select a listed record, right-click and select Show Remittance Details to display the Remittance Claim Details report.
Note: The right-click option is only enabled if the insurance paid or rejected the claim.
-
Review as necessary.
Make Claim Inquiries
For claims / treatments that have been submitted or resubmitted to an insurance company, you can inquire about the claim’s status.
Example: An insurance check has not yet arrived, so you want to check on the claim processing status.
Note: A claim inquiry form used must be added to the insurance company records by your institution during module setup.
-
Select a listed record that has been submitted on a claim.
-
Right-click and select Claim Inquiry to display the Submit Claim Inquiry Form window.
-
Complete the fields as necessary and click Submit.
- Document Control Number: If enabled, enter the document control number for this claim inquiry. This is used for internal purposes only.
- Comments/Remarks: If enabled, enter the full details of the inquiry.
Note: These fields are only enabled if the form type associated to the insurance company has places to print a document control number and comments.
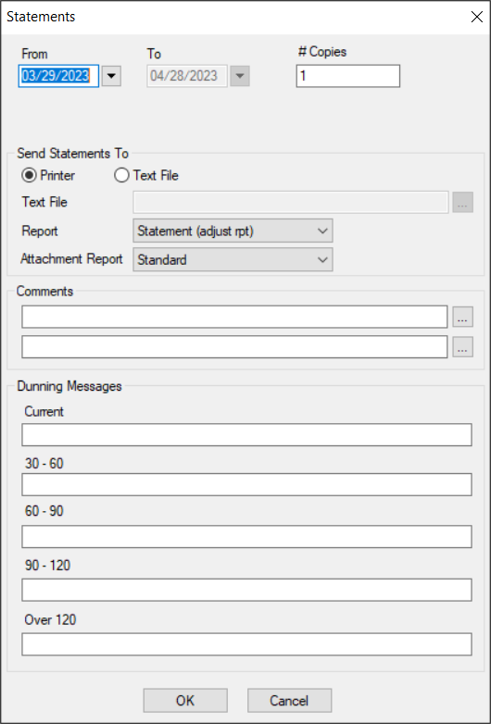
Print Statements
Most institutions choose to automate the printing/sending of statements, but you can print a statement for a single patient from the Treatment tab if necessary.
- Select a patient and open the Transactions module.
- Click the Treatment tab > Treatments or Planned sub-tab and review the listed planned or in process and completed treatments.
- Click Statement to display the Statements window.
- Complete the fields as necessary and click OK.
| From/To |
The date range defaults to the last 32 days.
If necessary, you can select a custom starting date from the calendar drop-down.
|
| # of Copies |
The number of copies defaults to 1.
If necessary, modify the value to indicate the number of copies required.
|
| Statement For
|
Select a guarantor on this patient’s record from the drop-down.
Note: This field only displays if the patient has a primary guarantor other than themselves or a secondary guarantor who is responsible for a payment plan.
|
| Printer / Text File |
Select a radio button to indicate if you want to print the statement or create a text file.
|
|
Text File |
If enabled, click the ellipsis to set a name and path for the file.
Note: This field is only enabled if the Text File radio button is selected.
|
| Report |
Note: If your institution has only one Statement report, this field does not display.
Select the statement report that will print or be created from the drop-down.
|
| Attachment Report |
Note: This field only displays if your institution has multiple Statement reports and the Maintenance > System > System Options > Electronic Attachments window > Statements checkbox is selected.
Select the statement report that will be attached as a patient attachment from the drop-down.
|
| Comments |
Next to each field, enter a comment manually or click the ellipsis to select a code from the Comment Codes window.
|
| Current / 30-60 / 60-90 / 90-120 / Over 120 |
Next to each field, enter the message that will display on the Statement report for the collection of accounts receivable currently outstanding, 30-60 days outstanding, 60-90 days outstanding, 90-120 days outstanding, and over 120 days outstanding.
|
|